Are you looking to bridge two amplifiers together?
If so, you’re in luck! Bridging an amplifier is a great way to boost sound volume and power output. It can help unify your audio equipment for a more powerful performance that will impress anybody listening.
The input/output parameters of the system determine which alternatives are available.
You might have an older amplifier lying around that you believe could help improve the sound quality of your music system.
In order to achieve the highest possible sound quality, you might connect it to the speakers and then use a different amplifier to connect the subwoofers.
A louder sound can be achieved by certain individuals by attaching numerous amplifiers.
We’ll go over what kind of amp setup needs bridging, why it might be necessary, the risks associated with this process, and how to handle them safely within this helpful guide!
Keep reading if you want to learn everything you need to know about bridging two amps correctly!
Related Post : What Size Amp Do I Need For A 1000-Watt Sub?
What You’ll Need?

You will need two amplifiers that are exactly the same. It is not enough for them to simply have comparable specifications.
They must be identical models. The amplifier that you go with absolutely needs to have a trappable feature.
You are going to need some RCA cables, speaker wire, and everything else that you would normally need in order to install an amplifier in your vehicle, such as tools and a head unit that is compatible with the amplifier.
How To Bridge 2 Amps Together?
First, let’s go through the RCA connections and the settings for the onboard amplifier, and then we’ll talk about how to wire the speaker cords.
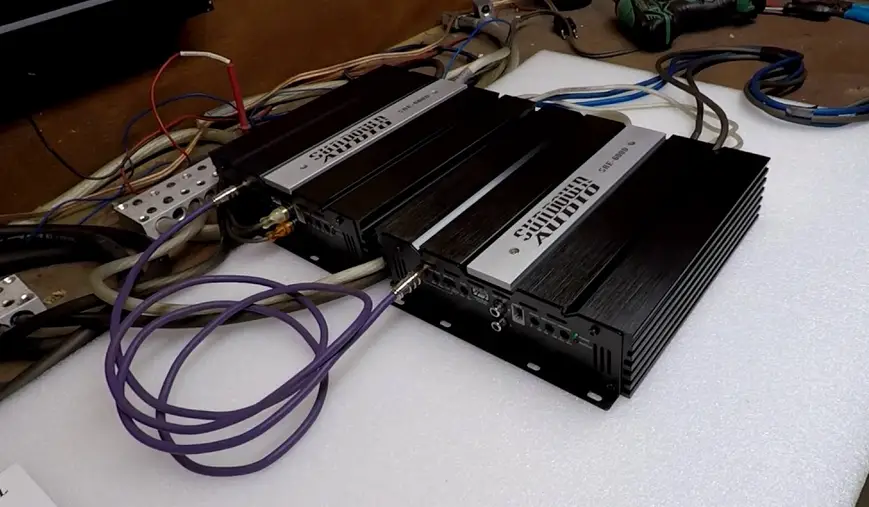
In this particular illustration, we will demonstrate how to strap together two monoblock amplifiers, such as the ones found in our AT Series.
1) On each amplifier, look for a switch that can be toggled between the “MASTER” and “SLAVE” positions. The position of the master must be assigned to one of them, and the position of the slave must be assigned to the other.
2) Make sure that your head unit is connected to the amplifier that you have chosen to be the master.
3) On the master amplifier, locate the RCA port labeled “MASTER OUT” and use that port to connect to the “SLAVE IN” port on the slave amplifier.
If the labeling on your amplifier is different, look for connectors labeled “BRIDGE OUT” and “BRIDGE IN.” A connection is made between the BRIDGE OUT on the master amp and the BRIDGE IN on the slave amp.
The initial part of the guide is rather easy to understand; however, the stages that come after that are often where many become confused.
Let’s begin the process of wiring in your amplifiers and speakers now that the head unit and RCA connections have been installed.
1) To begin, connect a jumper wire from the NEGATIVE terminal of your MASTER amplifier to the NEGATIVE terminal of your SLAVE amplifier. This will be the first step in the process.
2) Remove the POSITIVE lead from your subwoofer and connect it to the POSITIVE terminal on your master amplifier.
3) Connect the NEGATIVE lead from your subwoofer to the POSITIVE terminal on the SLAVE amplifier. (That’s a SUB- in comparison to a SLAVE+.)
4) Attach the wire from your remote to the MASTER amplifier, and then use a jumper cable to connect the remote terminals on both amplifiers to one another.
Note: If you are utilizing one of our trappable AT Series amplifiers, all you need to do to connect the ethernet connection for the remote to the master amplifier is plug it into the appropriate port.
5) At long last, hook up both amplifiers to the source of your power (the car battery).
To ensure that each amp receives the proper amount of power, it must continue to be linked to the vehicle’s battery separately.
Just use an amplifier switch to connect two amplifiers to a particular source
There are methods that are safe to use when connecting two amplifiers to your home theatre system or stereo, and there are also methods that are risky and might potentially cause damage to your audio system if you are not careful.
The following are the three secure methods:
Follow the steps outlined in this technique if you want to integrate various amplifiers into a single speaker or a couple of speakers whereas only using one amplifier at a time.
The ability to switch from one amplifier to another is provided by a straightforward box known as an amplifier switch.
You would not be able to play both amplifiers at the same time using this method, nor will you be able to raise the power or make the system louder; nevertheless, you will be able to utilize various amplifiers with your speakers at different times.
Why Would You Want To Do This?
Depending on the situation or the sort of music you’re listening to, you like the sound produced by a specific amplifier.
You are interested in contrasting the tonal qualities of two distinct amplifiers.
When watching movies, you should plug all of your speakers into an amplifier designed for home theatre surround sound.
When listening to music, however, you should simply plug your front speakers into a stereo amplifier.
Before you even begin to initiate the connection, you need to make sure that the switch on your amplifier is a “break-before-make” switch. This is the initial step in the process.
This indicates that it entirely removes power from the previous amplifier before connecting the new one. Your audio equipment will be damaged if you use any other sort of switch.
In addition to that, it should be able to swap each of the four connections (L+, L-, R+, and R-) independently. There ought not to be any sort of middle ground.
In addition, the switch shouldn’t have anything else inside of it other than the wires and the binding posts.
As opposed to other switches, it shouldn’t have any protective circuits, resistance, or impedance matching built into it.
The cost of purchasing a switch that satisfies all of these requirements can be fairly high. You can create a switch box for yourself if you don’t feel comfortable spending more than one hundred dollars on one.
Using a 4PDT switch is going to be the least complicated method available.
Depending on where you choose to get the switch and binding posts, you will only need to spend between ten and thirty dollars in total.
You can reduce costs even further by utilizing connectors that include a spring mechanism.
How To Build A Speaker Switch?
The following materials are all that is required to construct a speaker switch:
- Three different sets of binding posts for stereo speakers
- An enclosure (You could use a nice-looking but crappy speaker)
- Screws for mounting and adhesive
- Speaker wire ranging from one to one and a half meters in length to connect the binding posts to the switch
- Either one 4PDT switch or two DPDT switches can be used.
- Soldering iron and solder wire
- Instruments for cutting holes and building walls
Step 1
Remove the speaker’s driver, the front wall, and the bass tunnel from the back of the enclosure if you are going to use a subpar speaker as the container for your gear.
You should now have a box with a circular hole in one of the walls when you are finished.
Step 2
Plywood was used to construct the missing wall, which was then given holes drilled into it for use as binding posts.
Make the connection between the binding posts and the switch using the speaker wire.
After you have finished soldering, you should heat shrink the wires to isolate them.
Conductivity testing should be performed on all of the connections that you have established to rule out any possible short circuits.
Step 3
After removing the bass tunnel, locate the opening that was left and install the switch there.
Step 4
Binding posts should be installed on the back wall.
After you have finished putting everything together, perform another round of testing on the connections to ensure there are no short circuits. After assembly, wires frequently become dislodged.
Test everything out before attaching the amps.
The 2 Amp 2 Pair Speaker Selection Switch switcher splitter box continues to be the amplifier switch that has received the most praise.
The fact that its screw-down terminals can accommodate speaker wires of up to 14 gauge contributes to the product’s widespread appeal.
Connecting An Amplifier Switch
The connection of an amplifier switch is fairly simple, as there are only three fundamental stages involved:
Step 1
Connectors for two amplifiers, which are labeled as input, and connectors for two pairs of speakers, which are labeled as output, are located on the rear panel of the device.
Connect the speaker wire coming from the rear of one amplifier to the input labeled “A” on the switch box’s back.
Make sure that you relate positive things to positive things and negative things to negative things.
In addition to that, you should connect the right to the right and the left to the left.
Step 2
Install the speaker wire from the other amplifiers into input B on the rear of the switch box using the exact same method described before.
Step 3
To connect both of your speakers, you will need to run the speaker wires from the first output connectors located on the back of your switch box.
Once more, keep in mind that you should connect the right to the right, the left to the left, the positive to the positive, and the negative to the negative.
After you have finished making the connections, you can switch from one amplifier to another in a hassle-free and risk-free manner by using the controls on the front panel.
You could switch between the speakers if you took the hint in step 3 to wire in a second set of loudspeakers for the second output connectors.
If you do this, you can switch between the speakers at any time.
When connecting two amplifiers to one speaker, the following are essential considerations to consider:
The majority of people have the habit of adding a second amplifier to their system in order to achieve a louder overall volume.
Some even go as far as connecting two speakers to the amplifier at the same time in order to achieve the result of either increasing or even doubling the power output.
On your automobile sound system, you are able to bridge amplifiers using this method successfully.
On the other hand, you will never be able to use it for professional audio or in your own house.
It will, at the least, cause damage to the speakers, amplifiers, and other components that make up your audio system.
The following is a list of things that you must under no circumstances do:
Make use of a speaker switching box in an opposite manner.
Utilizing only one amp at a time will not improve the sound quality.
Amplifiers can be linked together using a specialized form of wiring, such as in series or parallel.
Connecting Two Amplifiers To One Source With A Surround Sound Processor
An audiovisual system, sometimes known as a home theatre system, is made up of several different components, one of the most important of which is a surround sound processor.
This is the component that is responsible for separating an audio stream into its component channels.
The audio signal could either be music or the soundtrack of a movie.
There are a total of six channels: two for the right and left speakers in the front, two for the left and right speakers in the rear, one for the subwoofer that produces low-frequency deep bass, and one for the speaker in the center channel.
The majority of audiovisual systems and home theatres consist of a receiver that is an all-in-one unit and includes a surround sound processor as well as amplifiers for the speakers and the subwoofer.
Consider purchasing the well-known Yamaha AVENTAGE RX-A3080 9.2-Channel Network A/V Receiver if yours does not come with the receiver already installed.
It is a high-end audio-video receiver that is packed with a lot of power, has great sound quality, and has all of the versatility and features that one could ever require in their system.
On the back panel of the receiver are the output connectors for the speakers and the subwoofer, and they are labeled clearly.
Because of this, establishing the connection is as easy as running speaker wires from the speaker output to the correct speakers and from the subwoofer outputs to the subwoofer.
There are high-end home theatre systems available that have additional output connectors from the surround processors.
This allows the user to connect to other amplifiers in addition to bypassing the amplifiers that are built into the system.
If you are finding a solution that combines more power with excellent sound quality, this is a good option to consider.
Wiring is more difficult to perform in this scenario due to the complexity of the situation.
Yet, if you break it down into manageable chunks, you can succeed. On the back panel of your home theatre receiver, you will see a section labeled “pre-out” outputs.
This part will be clearly labeled. The ‘pre-out’ outputs are line-level outputs, and in comparison to the speaker outputs, they have a significantly smaller amount of power.
They were developed specifically to be connected to amplifiers, which in turn are designed to be connected to a number of different speakers.
The following is an outline of the actions that are necessary to be taken in order to connect several amplifiers to the audiovisual system;
Step 1
On the rear panel of the AV receiver, you should look for the connectors labeled “Pre-out.”
Step 2
Connect the RCA connection wires to the input jacks on the amplifier for the front speakers by running them from the outputs of the front speakers.
Be sure to link the positive experiences to other positive experiences and the negative experiences to other negative experiences. The positive is typically represented by the color red.
Step 3
It is necessary to repeat the same process for the speakers that are located in the surrounds, the subwoofers, and the center channel, also known as the conversation speakers.
Step 4
Conduct the speaker cables from each amplifier to the speakers that are associated with that amplifier.
Keep in mind that the speaker on the left should be connected to the speaker on the left of the amplifier, and the speaker on the right should be connected to the speaker on the right of the amplifier.
Step 5
It is recommended that you consult the user manual of your receiver in order to learn how to modify the separate channel levels.
This will allow you to get the optimal degree of balance between the various speakers.
Get in touch with the retailer from whom you acquired your equipment for additional support if you are unable to get your mind around this entire procedure or if you have any issues regarding it.
Also, the customer service offered by the manufacturer can be of tremendous use.
Connecting Two Amplifiers To One Source With An Active Crossover
A device that is designed to separate the high frequencies from the low frequencies of audio transmission is known as an active crossover.
It delivers the low frequencies to one amplifier, which powers the woofer or subwoofers, and the high frequencies to another amplifier, which powers the high-frequency speaker drivers, such as the midrange and the tweeter.
Most speakers already have crossovers built into them, but an active crossover will typically come in its own separate box.
It is placed in between the stereo preamplifier and the amplifier in the signal chain.
To link two amplifiers with an active crossover, you will most likely need one amplifier for the midrange and tweeter speakers and another amplifier for a woofer or subwoofer.
This will allow you to connect the two amplifiers.
There are a few advantages that come along with connecting two amplifiers using an active crossover, including the following:
- An increase in intensity
- Clarity and sound quality have been significantly improved.
- Deeper bass
- Reduced levels of coloring and distortion across the entirety of the musical spectrum
- While employing an active crossover, some of the most important things to be noted are as follows:
- Get a crossover of exceptional quality that is tailored to your system, speakers, and preferences.
- Get amplifiers of the same excellent quality that are well suited for the speakers they are driving in terms of power output, impedance, frequency range, and any other variables that may be relevant.
- High frequencies and low frequencies ought to be fed into the speakers via separate inputs.
It shouldn’t just be a single set of connectors for the speaker cable, either. A separate subwoofer that is housed in its own box and is equipped with its own connectors is the bare minimum that should be present.
A quick tip, at this level of listening and equipment, it would be smart to at least involve a professional audiophile dealer to help you select and set up the amplifiers, speakers, and crossover. They will assist you with these tasks.
Useful Tips
It is not a given that carrying out each of the procedures outlined above from the beginning would result in success for you. Even the most basic of them has the potential to fail.
Following is a list of helpful hints that can assist you in avoiding and solving some of the more fundamental problems that you are likely to run into:
1- Check twice to ensure that all of the machines are operational.
Check that all of the machines are turned on and that the volume controls are turned all the way up.
This comprises the amplifier, receiver, and preamplifier, in addition to any source equipment you may be utilizing.
It is necessary to ensure that the apparatus is connected and that the power ON lights is illuminated.
Be sure to turn the equipment on and off in the correct sequence whenever you use the on/off switches.
Prior to turning on your power amplifier, make sure you have first turned on your receiver or preamplifier.
When you turn off the power, you should switch things around.
This helps you avoid unexpected noises and loud pops, as well as protects your system from any potential damage that could have been caused.
2- Make sure that you have chosen the appropriate source.
This is a common mistake made by novices, and it drives a lot of people crazy.
For example, if you are playing a DVD, you need to make sure that the input selector on your receiver is set to DVD.
It is especially difficult to understand when high-end AV receivers, which allow connection to a number of different sources, are used.
A single advanced home theatre receiver can have inputs for as many as four distinct DVD players at the same time.
3- Make sure that the fuses and the circuit breakers are working properly.
In the event that a protection circuit fails, you may occasionally notice disruptions to the audio signal or the power supply.
To resolve this issue, you will merely have to turn off the machinery for a short while and then let it reset itself.
It’s possible that the protection circuitry will check for high heat as well, which will need you to switch off the equipment and then allow it some time to reset.
4- Verify each of the cables.
Verify that all of the cables (those connecting the amplifiers to the stereo, those connecting the amplifiers to the speaker, and those connecting the source equipment to the stereo or home theatre system) are in the correct locations and that they are connected securely.
5- Experiment
In order to pinpoint the source of the issue, you should first attempt to link all of the individual pieces of equipment to one another and then try to switch the cables connecting them.
Don’t try to figure out what’s wrong with any of the equipment by disassembling it or opening it up.
You run the risk of causing damage to it, having your warranty voided, or giving yourself a potentially lethal electric shock. Instead, seek the assistance of a properly trained and certified technician.
Benefits of Strapping Two Amplifiers
Let’s discuss some of the advantages of strapping amps, as well as the reasons why people go into the trouble of doing this in the first place.
The primary objective of strapping, which is often referred to as bridging, is to enable several amplifiers to supply power to a single voice coil.
You will only need to adjust the primary amp (the master) with this configuration because the settings for the secondary amp (the slave) will be taken from the master.
This is an additional advantage of this particular design. It is much simpler to do this than to try to dial in the exact settings on two different amplifiers.
You provide yourself the ability to replace one of the amps in the event that something goes wrong by ensuring that you have two smaller amps rather than one larger amp.
In the event that you had one amplifier that was larger and more costly, you would be required to replace the entire system.
Strapping is also useful if you begin with a single, less powerful amplifier but subsequently determine that you require additional power for your setup.
The power of your amplifiers can be increased by strapping, and you can continue to make use of the same amplifier even after you have done so.
This provides you with an upgrade path that is more realistic as compared to the alternative of replacing your first amplifier with a new one and then not using the first amplifier at all.
Those who are putting together their very first aftermarket vehicle audio systems are prone to forgetting about the need to have an upgrade route, but it is necessary to keep in mind that this is something that should be considered.
You are able to adjust the gain on both amplifiers at the same time if you have one of our AT Series amplifiers that comes equipped with an advanced gain knob (or one of our other amplifiers that comes equipped with a standard knob).
This is possible because the master controls the settings of the slave.
When compared to using a single amplifier, using strapping will provide you with twice the power as well as twice the impedance load.
If you have an amplifier that produces 1000 watts at 1 ohm and you connect it to another amplifier that produces 1000 watts at 1 ohm, you will have 2000 watts at 2 ohms.
As each amplifier will still be responsible for managing its own 1000 watts at 1 ohm, but when combined, they will send out twice as much power, you will need to make sure that your subwoofer is able to accommodate this level of output.
Final Thoughts
You have a plethora of options at your disposal when it comes to connecting two amplifiers to a single source.
There are many various motivations for why individuals may like to connect several amplifiers to a single source.
The goal of the vast majority of individuals is often to improve sound quality while simultaneously increasing volume.
You have three options to pick from, and each one is both risk-free and uncomplicated to carry out.
Because each system has its own unique input and output options, the possibilities change depending on which system you choose.
After you have learned how to connect two amplifiers together, getting the finest possible sound quality whenever you want to listen to music or watch a movie will be as simple as plugging in your headphones and turning up the volume.
Any type of amplifier, from a guitar amp and bass practice amp to an amplifier designed for metal or a ukulele, can be used to make the connections.