If you’re looking to bridge an amp and power a single subwoofer, it’s important to understand the process and how it works.
To bridge the amp, use only one of the amp’s outputs, not both.
You should then connect the single output to the bridged input on your sub.
Next, configure the gain control on your sub to match that of your amp’s input sensitivity setting in order for the best results.
Once everything is confirmed, you can get ready for an amplified music experience like never before!
This guide will provide detailed instructions on how to bridge a 2-channel amplifier so that one channel is powering your speaker or subwoofer and the other is unused.
Armed with this knowledge, you can make sure your audio project turns out just right!
Also Read:
- What Size Amp Do I Need For 2 800 Watt Sub?
- How Long Can A Subwoofer Cable Be? (Explained!)
- What Size Amp Do I Need For A 1000 Watt Sub?
What Is Bridging?
The process of bridging an amplifier is referred to as connecting two amplifiers together to create one stronger signal.
This is typically done when one amplifier is not powerful enough to drive a certain speaker or subwoofer.
When done correctly, bridging can significantly increase the overall power output of your audio system.
Why Would I Want to Bridge My Amplifier?
There are some reasons why you might want to bridge your amplifier.
If you have a large audio system with multiple speakers, you may need to bridge your amplifier in order to get enough power to all of the speakers.
Additionally, if you have a subwoofer that is difficult to drive, bridging your amplifier can give it the extra energy it needs.
How To Bridge A 2 Channel Amp To 1 Sub?
At first glance, it could appear critical and difficult to bridge any type of amp.
Having said that, once you have a proper understanding of the procedure, it is really simple, and anyone is capable of doing it themselves, regardless of how many channels your amplifier already has.
This is due to the fact that the fundamental procedure is the same for each channel, and if you learn how to bridge a two-channel amp, you will also be able to bridge a four-channel amp once you have gained the necessary experience.
You just need some fundamental knowledge of automobile audio wiring in order to bridge a two-channel amplifier with ease.
What Do You need?
You will need some items to work with before you can begin the procedure.
This is a prerequisite. The following is a list of the things you will need:
- Check to see if your two-channel amplifier has a bridging option by using the two-channel amplifier.
- Screwdriver: using this tool will assist you in connecting the screws that are already attached to the amp, as you have seen in the operations that came before.
- Wire stripper: The wire stripper is the tool that will be utilized in the process of separating the edge of the wire prior to inserting it into the amplifier channel.
- Speaker wires: in order to connect the speaker wires to the amplifier’s terminals, you will need to use speaker wires.
Connecting your amplifier to a pair of subwoofers with an impedance of 2 ohms is the most typical technique to achieve the “bridged” sound effect. To bridge the amp, the following technique should be followed:
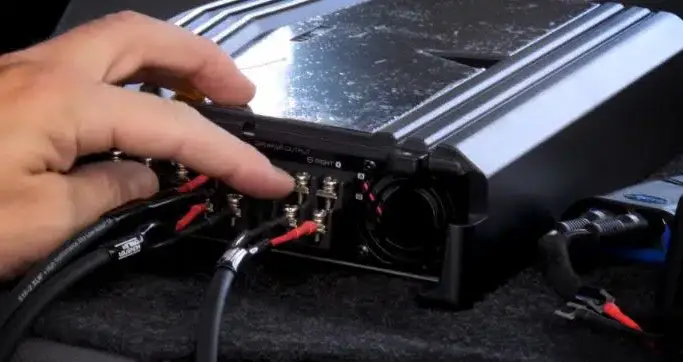
1- Locate The Speaker Wire Terminals
Find the terminals on the amplifier where the speaker cables connect. It is estimated that you would be able to view the wire terminals or channels for the two speakers.
Positive and negative terminals are both included in this set of terminals.
Each of the terminals is equipped with a screw-down clamping device that assists in maintaining the speaker wire in its proper position.
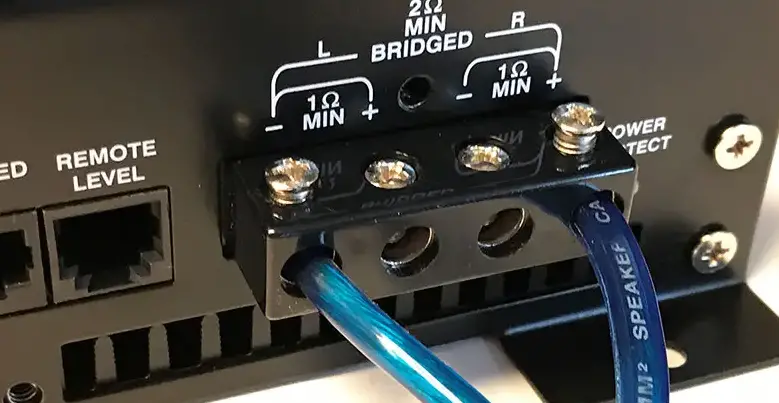
2- Connect The Positive Terminal Of Channel One To The Subwoofer
To remove about half an inch of insulation from either end of the wire, use a tool called a wire stripper.
Connect the positive terminal of the first channel’s subwoofer to the positive terminal of the first subwoofer using the speaker wire.
Connect the positive terminal of the first channel’s speaker wires to the positive terminal of the first subwoofer’s speaker wires.
With a screwdriver, check that the speaker wire is firmly fastened down in the amp’s terminal.
3- Connect The Negative Terminal Of Channel Two To The Subwoofer
Again, a wire stripper should be utilized to remove approximately half an inch of insulation from either end of the wire.
It is necessary to run the speaker wire from the negative terminal of channel two to the negative terminal of the first subwoofer.
Put a clamp on the speaker wire, and then make sure the connection is secure by screwing the terminal clamp down as tightly as possible.
How To Wire A 2-Channel Amp To 2 Speakers And A Sub
Although a two-channel amplifier offers additional options for your audio connections, the majority of the time, these types of amplifiers are only used with either two speakers or two speakers and a subwoofer.
They are not utilized with both at the same time.
Having said that, it is still possible to connect a two-channel amplifier to two speakers and a subwoofer.
You have three different options to choose from, which is a fortunate development.
1- Using A Two Channel Amp Rated 2 Ohms Stereo, 2 Ohms Bridged
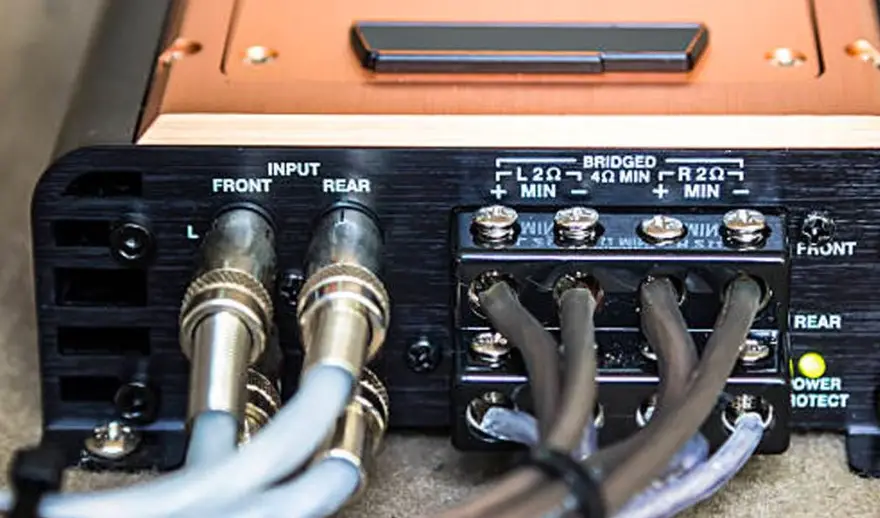
This is the most typical configuration. Each channel of the front amplifier is wired with two speakers in parallel, resulting in an impedance of 2 ohms per channel.
After that, the subwoofer is wired up to the two channels in the back of the system.
It is imperative that you familiarise yourself with the bridged wiring instructions provided by the amplifier, as not all amplifiers utilize the same bridged wiring.
2- Using A TwoTwo Channel Amp Rated For 2 Ohms Stereo, 2 Ohms Bridged
According to this strategy, each channel of the front amplifier is wired with two speakers in parallel, resulting in an impedance of 2 ohms per channel.
The ohm rating of the subwoofer can be 2.
3- Using A 2-Channel Amp Rated For 2 Ohms Minimum Speaker Load
Each of the channels on the front amplifier is linked in parallel to two speakers, making the total impedance for each channel 2 ohms.
In order to maintain a speaker load resistance of 2 ohms across each channel, you will require resistors.
2 Channel Amp Wiring Sub And 2 Speakers
A two-channel amplifier allows for the connection of two speakers as well as a subwoofer.
Nevertheless, in order to power the sub, you will need to connect two of the channels together and bridge them.
You may then connect the two speakers to the other two channels.
How To Bridge A 2-Channel Amp To 2 Speakers And 1 Sub?
This is a simple link to make. Connect the two speakers to the amp’s front channels using the appropriate wiring.
After that, bridge the rear channels to the subwoofer and wire them so that it is connected to the rear channels.
Can You Use A 2 Channel Amp For 1 Sub?
As was said before, it is not difficult to connect two outputs to the subwoofer while retaining the ability to use the other two channels for the front speakers.
How To Bridge A 2-Channel Amp To 2 Subs?
It is a simple method to connect two subwoofers to an amplifier that only has two channels.
By following the technique that we have explained here, you will easily be able to bridge your two-channel amplifier to two subwoofers, just as we have covered in the previous section.
1- Strip The Wire
Using the wire stripper, remove the insulation from the wire until you have about a half inch left.
2- Fix The Positive Wire
Connect the red wire to terminal one, which should be connected to the positive option of the first channel.
3- Fix The Negative Wire
To finish connecting the first speaker, insert the black wire into terminal Two, then connect it to the second channel’s negative option. This will make the connection.
What Happens If You Bridge A Non-Bridgable Amp?
A non-bridgable amplifier cannot have its channels bridged.
You will need to take precautions to ensure that the amplifiers you buy and install are compatible not only with your stereo system but also with one another.
If they are unable to be bridled, the only option you will have is to purchase new ones for both of them.
You also have the option of purchasing a receiver that is an aftermarket item and that provides additional channels of amplification for subwoofers (sometimes known as “satellite speakers”).
When Should I Bridge My Amp?
As you “bridge” the channels, you’ll notice that the power output goes up.
The vast majority of amplifiers must be bridged in order to power a subwoofer.
This procedure combines two channels into one subwoofer or two channels into two subwoofers.
As a result, right now is typically the ideal time for you to think about bridging your amplifier.
Does Bridging An Amp Change The Ohm Load?
When you bridge an amplifier, you are essentially employing it in the mono mode that it was designed for.
Because there is now only one load being driven instead of two, the impedance of each channel has been reduced by one-half as a result.
What is different about this configuration is the highest power output, which is achieved by dividing the wattage between both channels and then combining them in order to power a single speaker or subwoofer.
Yet, at the end of the day, keep in mind that purchasing a monoblock amplifier is going to provide you with the finest results for your subwoofer.
A monoblock amplifier is superior to a two-channel or two-channel amplifier when used with a subwoofer.
How Do I Know If My Amplifier Is Bridgeable?
Knowing if your amplifier is bridgeable is a key factor in properly setting up and operating your stereo system.
A good way to know is to look for a switch with the word “Bridge” on it.
This switch can be found on either the rear of the amp or near the control knobs facing you.
Many amplifiers will also come with an owner’s manual that clearly labels whether or not your specific model is bridgeable.
If you have any doubts, you can always contact the manufacturer directly for clarification.
What Is The Difference Between A Bridged And Unbridged Amplifier?
A bridged amplifier combines two separate amplifiers into one, usually in order to boost output power and efficiency.
This doubles the capacity of an amplifier, therefore allowing it to handle heavier loads than a typical unbridged model can.
On the other hand, an unbridged amplifier utilizes both channels as separate entities that each run on different power sources.
This type of setup offers a more consistent and dynamic tone because it allows more definition between different frequencies throughout its range.
Therefore, whether you are looking for more power or excellent sound quality within your project, choosing between a bridged or unbridged amplifier ultimately depends on your specific needs.
What Are The Risks Of Bridging An Amplifier?
1- Overheating
One of the primary risks of bridging an amplifier is overheating.
When an amplifier is bridged, it produces more power than it would if it were running in stereo mode.
This increase in power can cause the amplifier to overheat, which can lead to damage to the amplifier or even a fire.
2- Short Circuits
Another risk of bridging an amplifier is short circuits.
A short circuit occurs when there is a break in the electrical current flowing through the amplifier.
This can happen if the wires connecting the amplifier to the speakers are not properly insulated or if the amplifier itself is damaged.
Short circuits can cause damage to the amplifier and may even start a fire.
3- Electromagnetic Interference
Bridging an amplifier can also cause electromagnetic interference (EMI).
EMI is a type of interference that can disrupt electronic equipment, causing it to malfunction.
EMI can be caused by a variety of factors, including electrical equipment, power lines, and even the sun.
4- Ground Loops
Ground loops are another type of interference that can be caused by bridging an amplifier.
Ground loops occur when there is a difference in voltage between two pieces of equipment that are connected together.
This can happen if one piece of equipment is plugged into a different outlet than the other piece of equipment or if one piece of equipment is grounded and the other isn’t.
Ground loops can cause problems with audio quality and may even damage your equipment.
5- AC Line Noise
AC line noise is another type of interference that can be caused by bridging an amplifier.
AC line noise is a type of electrical noise that can disrupt audio signals and cause problems with sound quality.
AC line noise can be caused by a variety of factors, including power lines, electrical equipment, and even the sun.
Conclusion
Bridging a two-channel amp to a single subwoofer is easy! Simply connect the single output of your amp to the bridged input of your sub, then adjust the gain control accordingly.
But first, make sure all components are compatible—a few minutes of extra research and double-checking could save you from any costly mistakes. Wait no longer—enjoy an amplified music experience like never before!
Also Read: